Introduction
Hello, my name is Emmanuel Lecouturier, and I am a self-taught French artist. I have been working as a character modeler in the games industry since 2010. I’ve spent the last 7 years working for Asobo Studio on amazing projects such as HoloLens: Fragments, and most recently on A Plague Tales: Innocence. I am currently living in Montreal and looking for new career opportunities.
In this article, I will break down several aspects of my piece, -Sorceress-, including hair creation, lighting and presentation of the final renders using Toolbag.
Hair Creation
Reference Collection
When it comes to creating art, studying reference is essential. It’s even more important with hair creation, as it can be pretty complex to comprehend. For this character, I wanted thick, messy braid with lots of flyaways loosely wrapping around her shoulder. I gathered as much reference as I could to better define the look that I wanted. Having reference from different angles helped a lot. At this point, I study my reference and trace over it with color to better understand where the strands start and finish, how they interact with each other, and the general flow of the hairs. This method was especially useful for making a braid. As I studied my reference, I tried to identify how much variation I’ll need on my texture and how I would organize it.
Modeling
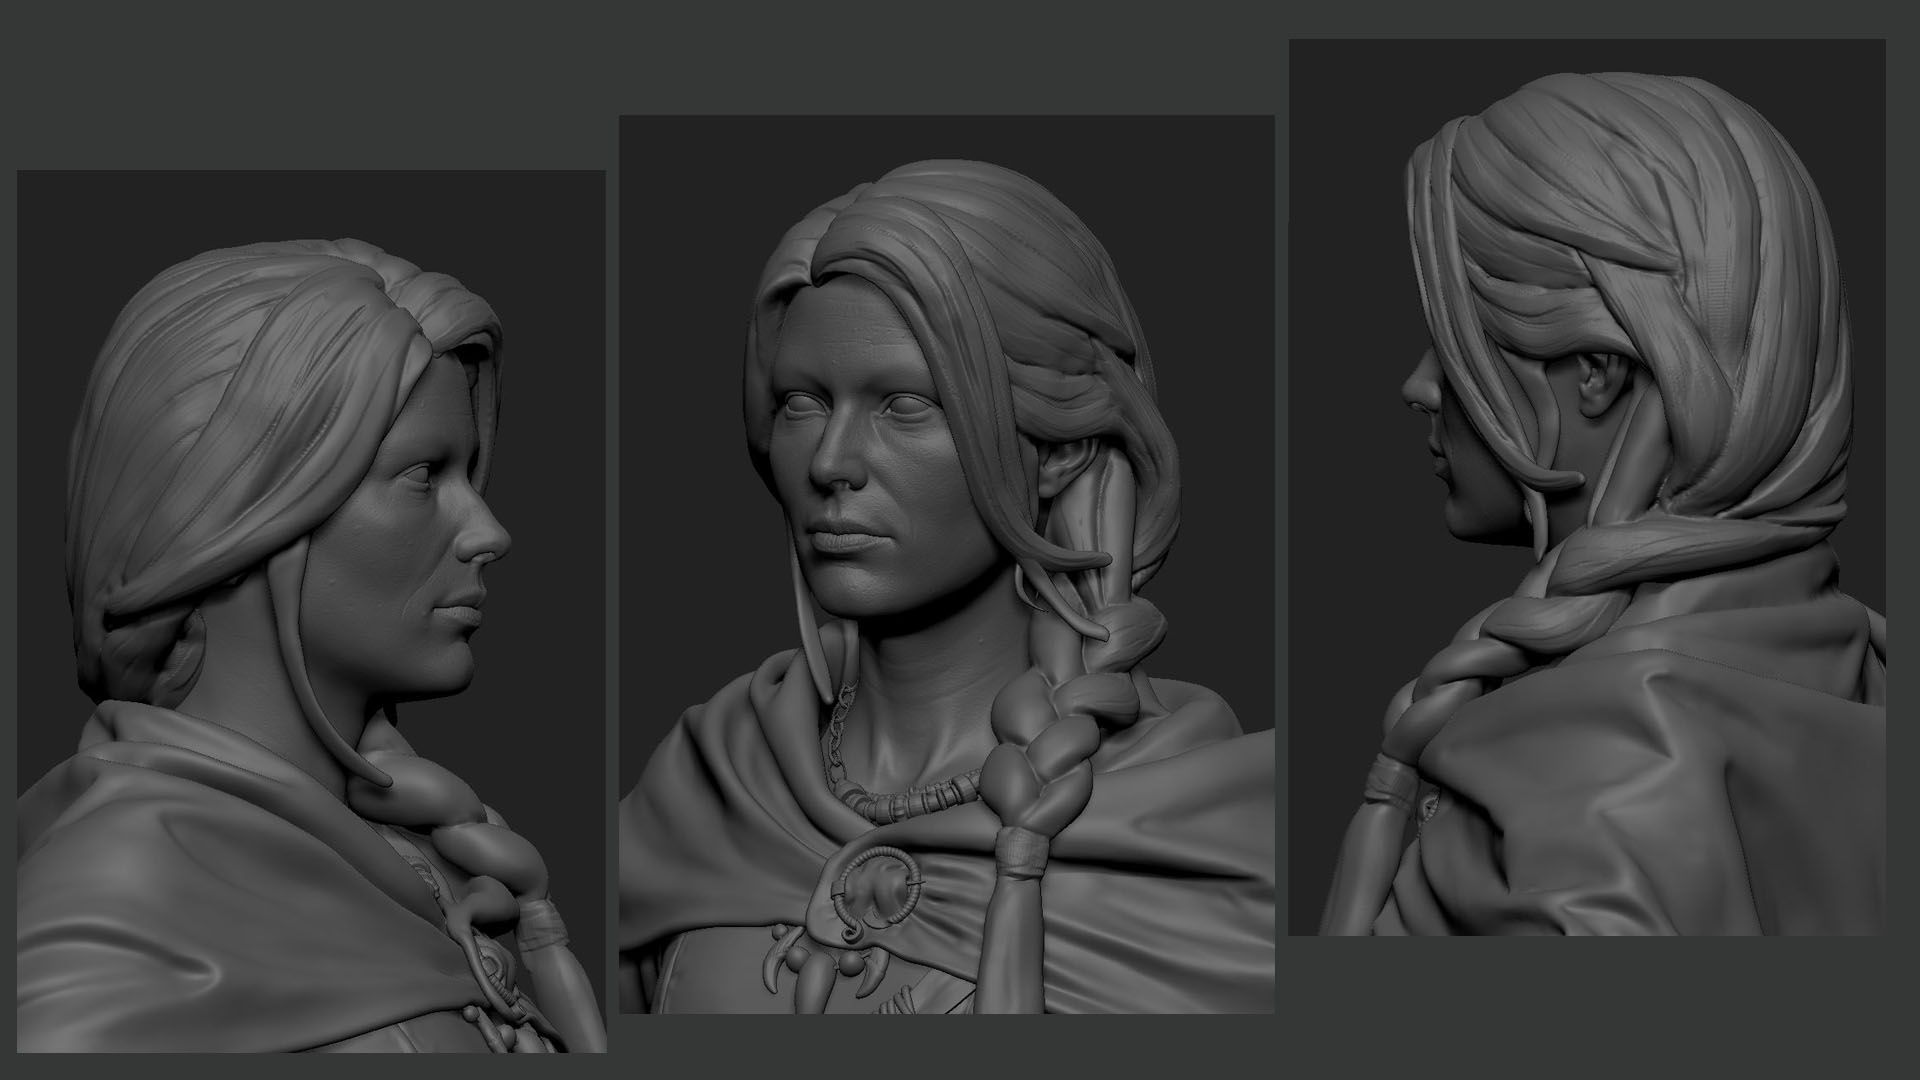
I always start making hair with a quick sculpt in Zbrush. It helps give me a better idea of the look I’m searching for as I study and try to reproduce what I see in my reference images. It allows me to focus on silhouette, volume, and flow with easy-to-use tools. At this stage, I’m able to iterate and drastically change the hair style. I treated this sculpt as a prototype to build my hair cards over.
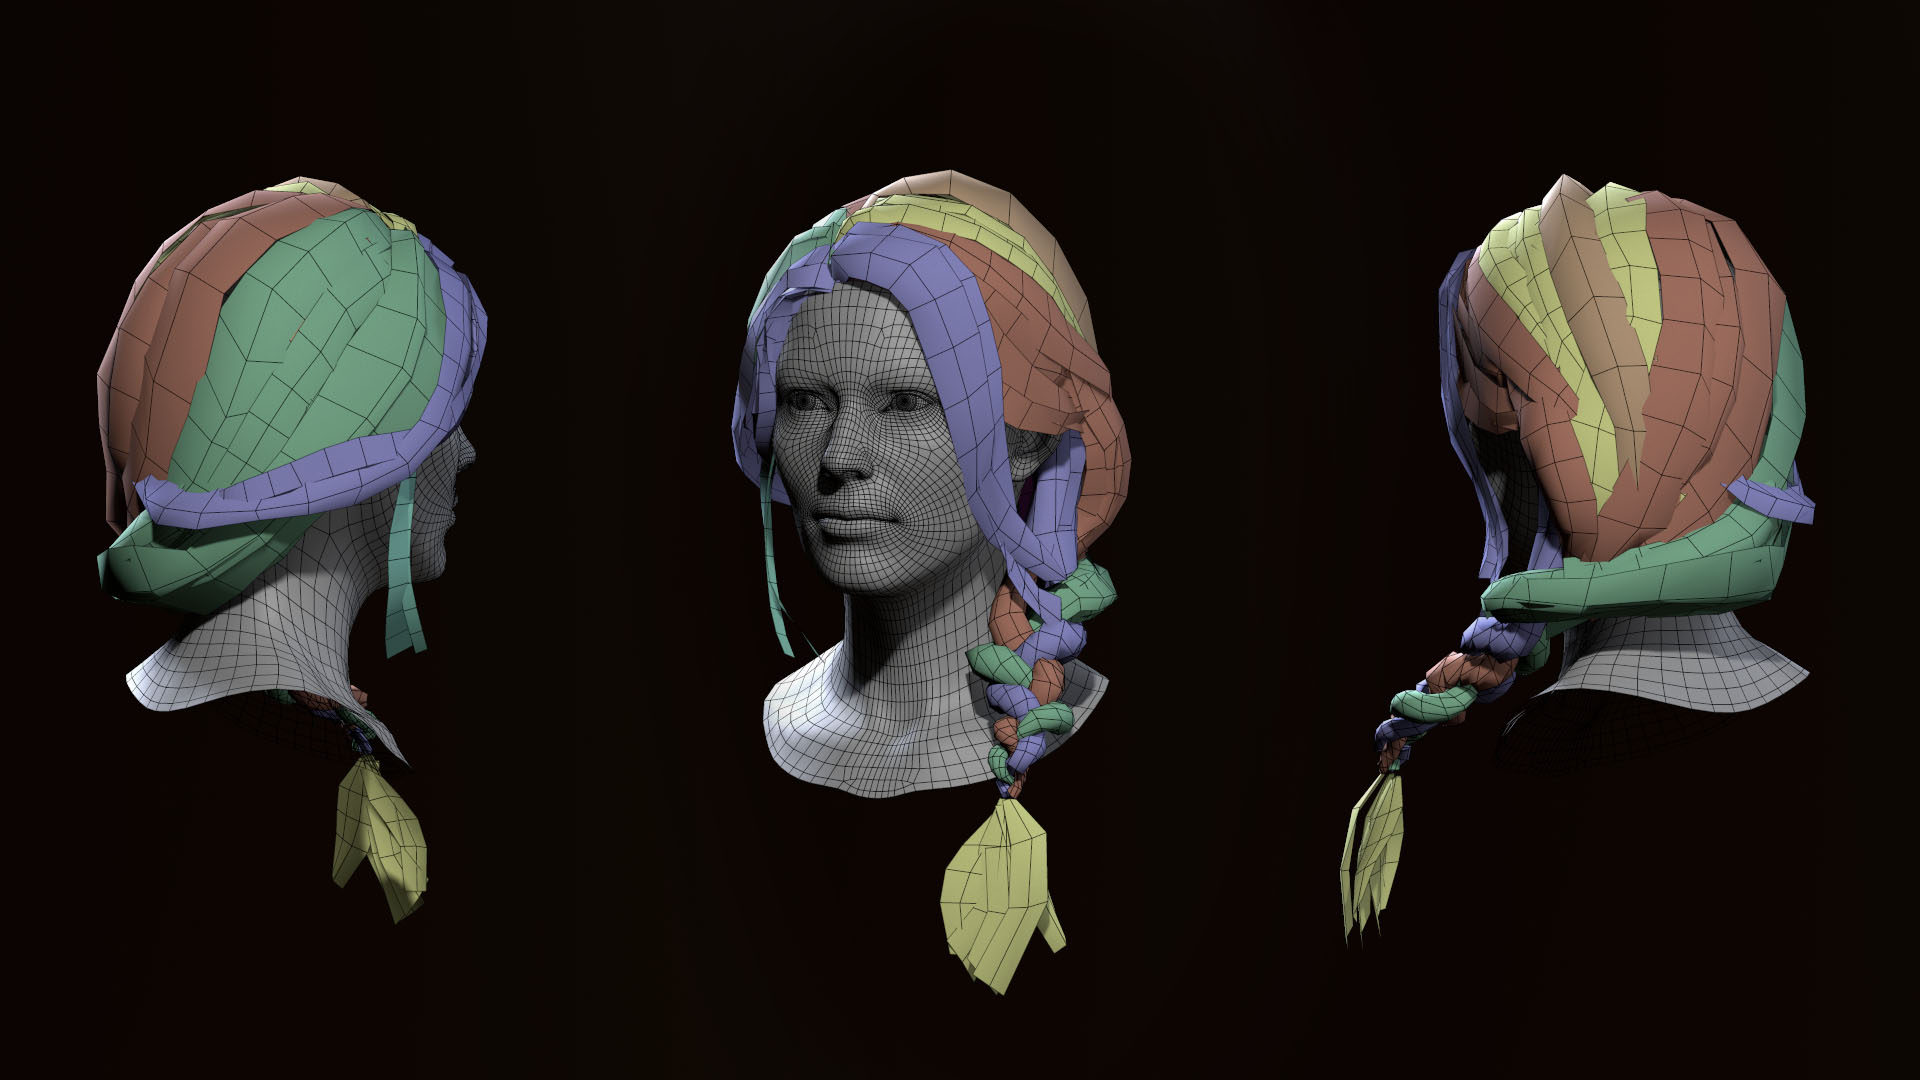
All the hair cards are hand placed in 3ds Max. I used hair cards with as few polys as possible to edit them easily and subdivide them later for a smoother look. I started building some strands on top of my Zbrush sculpt, carefully getting the flow and volume right. I colored the strands exactly how I colored over my reference to help me. The first layer of hair is meant to capture the style, volume, and flow. It needed to be dense enough to hide the scalp underneath. At this point, I started working on the texture to have a better idea of what the final result will look like.

I continued building up the hair cards layer by layer, taking care to minimize interpenetration of hair cards. Below is my approach:
- Base layer: To capture the flow and volume of the hairstyle.
- Big break-up: The big strands of hair that break the general flow and have a more organic look.
- Small break-up: Smaller strands to give a messier look.
- Flyaways: These break the silhouette.
- Transitional: Hairs found on the forehead help with the transition from hair to skin.
Building hair cards is a very iterative process where modeling and texturing are really connected. It’s good practice to stay organized by keeping each layer of hair on a separate object so they can be modified easily. Be sure to check the result in Toolbag often.
Texturing

I generated my hair textures in Maya using XGen and Arnold. All of the textures were rendered in render passes except for the specular map, which was created in Photoshop. Once I have set up my renders, I can iterate on the grooming in XGen and quickly view the results in Toolbag, where the textures are automatically updated. As the model progresses, so will the textures, and I make adjustments to the grooming as well as the material. You can see how each type of hair card is clearly organised in my texture:
- Base hair
- Small break-up hair
- Big break-up hair
- Flyaways
- Transitional hair
- Braid tails
Material Setup

Below are the texture maps I created for my hair textures:
- Albedo
- Opacity
- Specular
- Normal
- Direction
- Occlusion

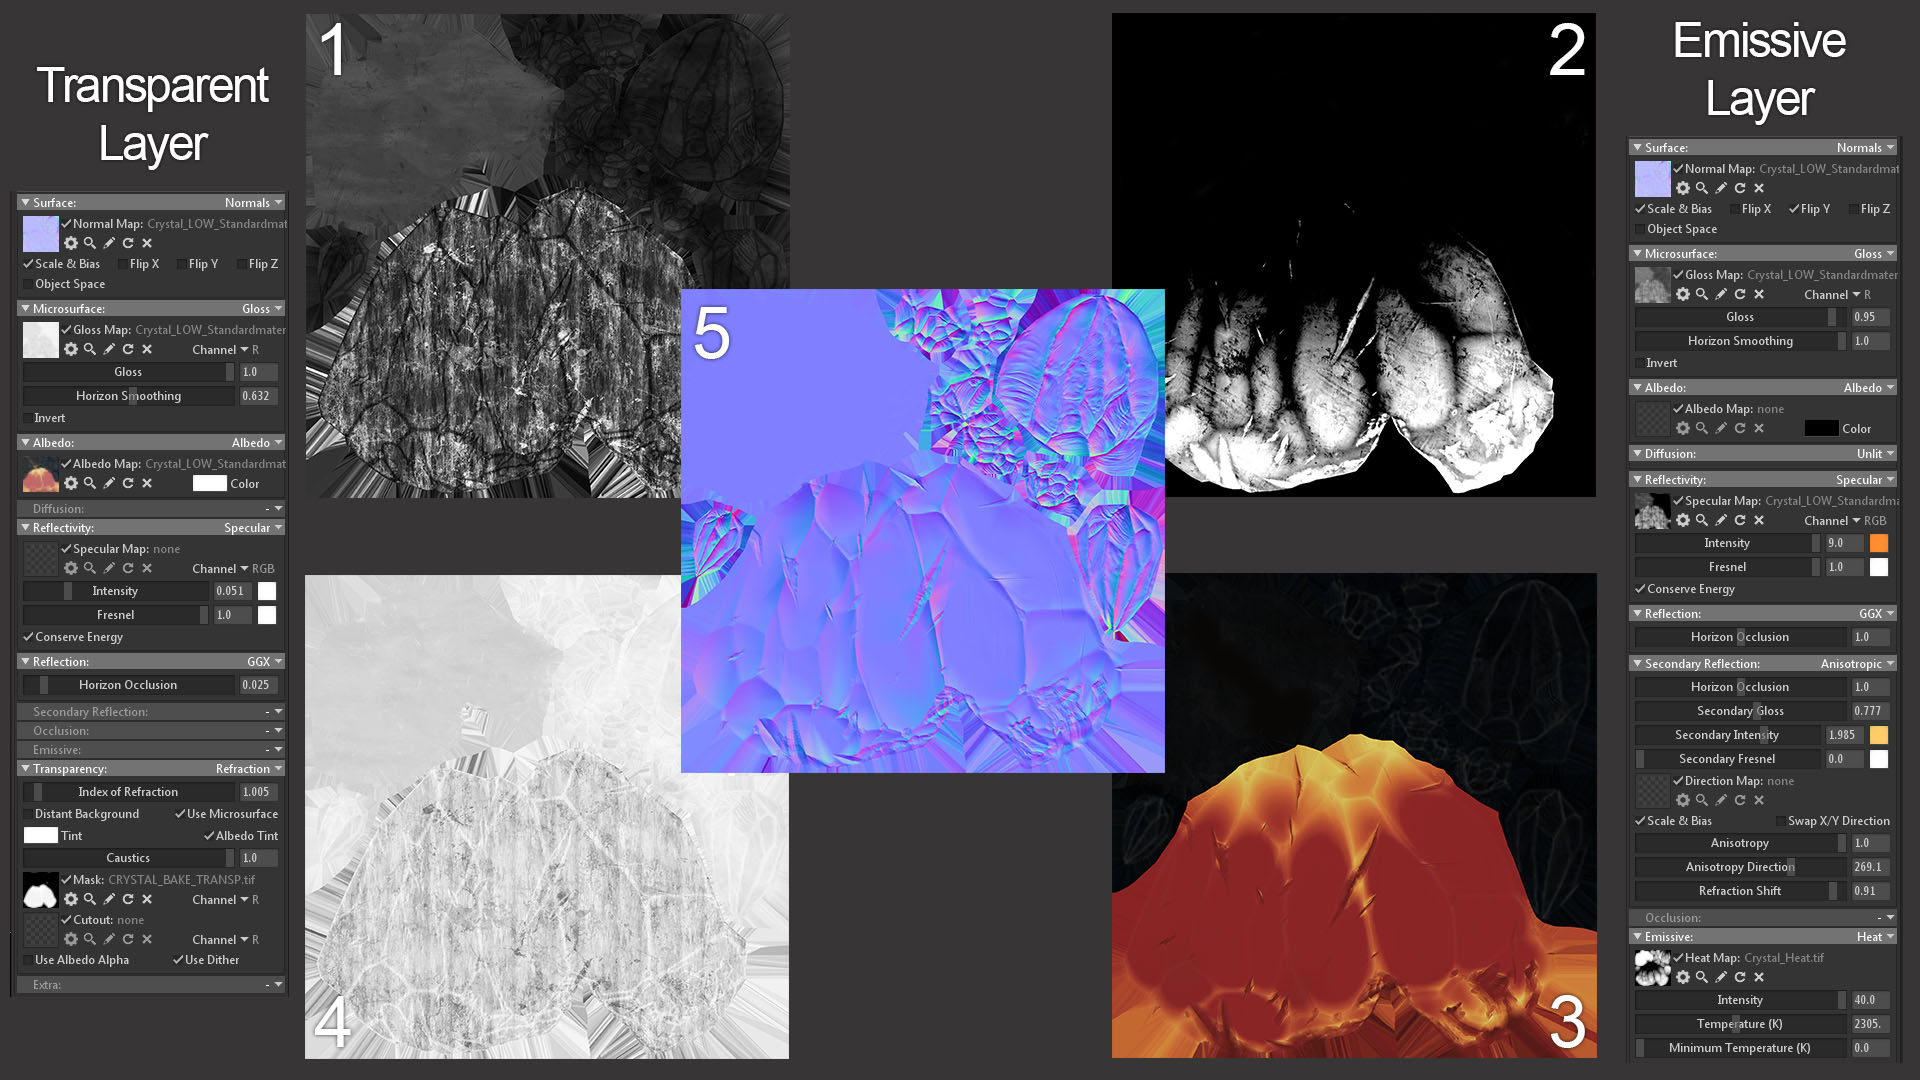
The image above shows the buildup of each texture and how it affects the overall result. The material setup is as follows:
- Normal Map (4): In this map, I only have the information of each hair normal to help break up specular highlights. I don’t want any other normal information (waviness or curvature), as this needs to be fully controlled by geometry.
- Albedo Map (1): There is not much variation in this map, since I wanted an almost entirely white/grey hair color. There is a slight gradient from the roots to the tips, and some small variations in each strand of hair.
- Gloss: I did not use a gloss map. The variation was done in my Reflectivity and Cavity maps instead.
- Horizon Smoothing: I toned this down a little bit to have softer reflections on edges where Fresnel occurs.
- Diffusion: I used the Subsurface Scatter Diffusion model to simulate how light scatters through the hair. The lighter the hair, the more scattering happens, so I used a pretty high Scatter Depth value. The value is set really high because of the scale of my scene. To check your scale, click the Show Scale Reference option in the Scene object properties. The scattering also helps smooth out any hard shadows.
- Specular map (3): This one was really simple and done in Photoshop. It’s a grey color with some noise applied and stretched in the direction of the hair. It helps give a shimmer to the hair.
- Fresnel: As with the Horizon Smoothing setting, I reduced the Fresnel value to dull down the reflectivity on the hair.
- Reflection: I used the Anisotropic Reflection model to simulate the reflection of light on hair and plugged a Direction Map (5) to control this. Be sure to have the anisotropic reflections follow the direction of each hair card.
- Secondary Reflection: This simulates light passing through the hair, reflecting to the other side and bouncing back outside of the hair. I used a low Gloss value to have a bigger spread than the primary reflection. This is more visible on lighter hair, so I used a very high Intensity value here. I used the same Directional map and Anisotropy setting as the primary reflection. Due to the scaly nature of hair, which looks like a series of cone shapes when magnified, the secondary reflection is shifted from the primary reflection along the direction of the root. The Refraction Shift parameter moves the secondary specular along the hair and simulates this effect.
- Cavity: I used the Ambient Occlusion map that I rendered in Maya in the Cavity slot. It was probably the most important map, since my Albedo and Specular maps were simple. The Diffuse Cavity slider helped create micro shadows in the hair and gave a better sense of depth. The Specular Cavity slider blocked reflectivity in the micro shadow area to give more depth and break the uniformity of the reflection.
- Transparency: I used the Dither Transparency model with an Alpha Map (2), and made sure to deactivate Cull Back Faces in my mesh properties to have double sided faces.
Rendering Normal & Directional Maps
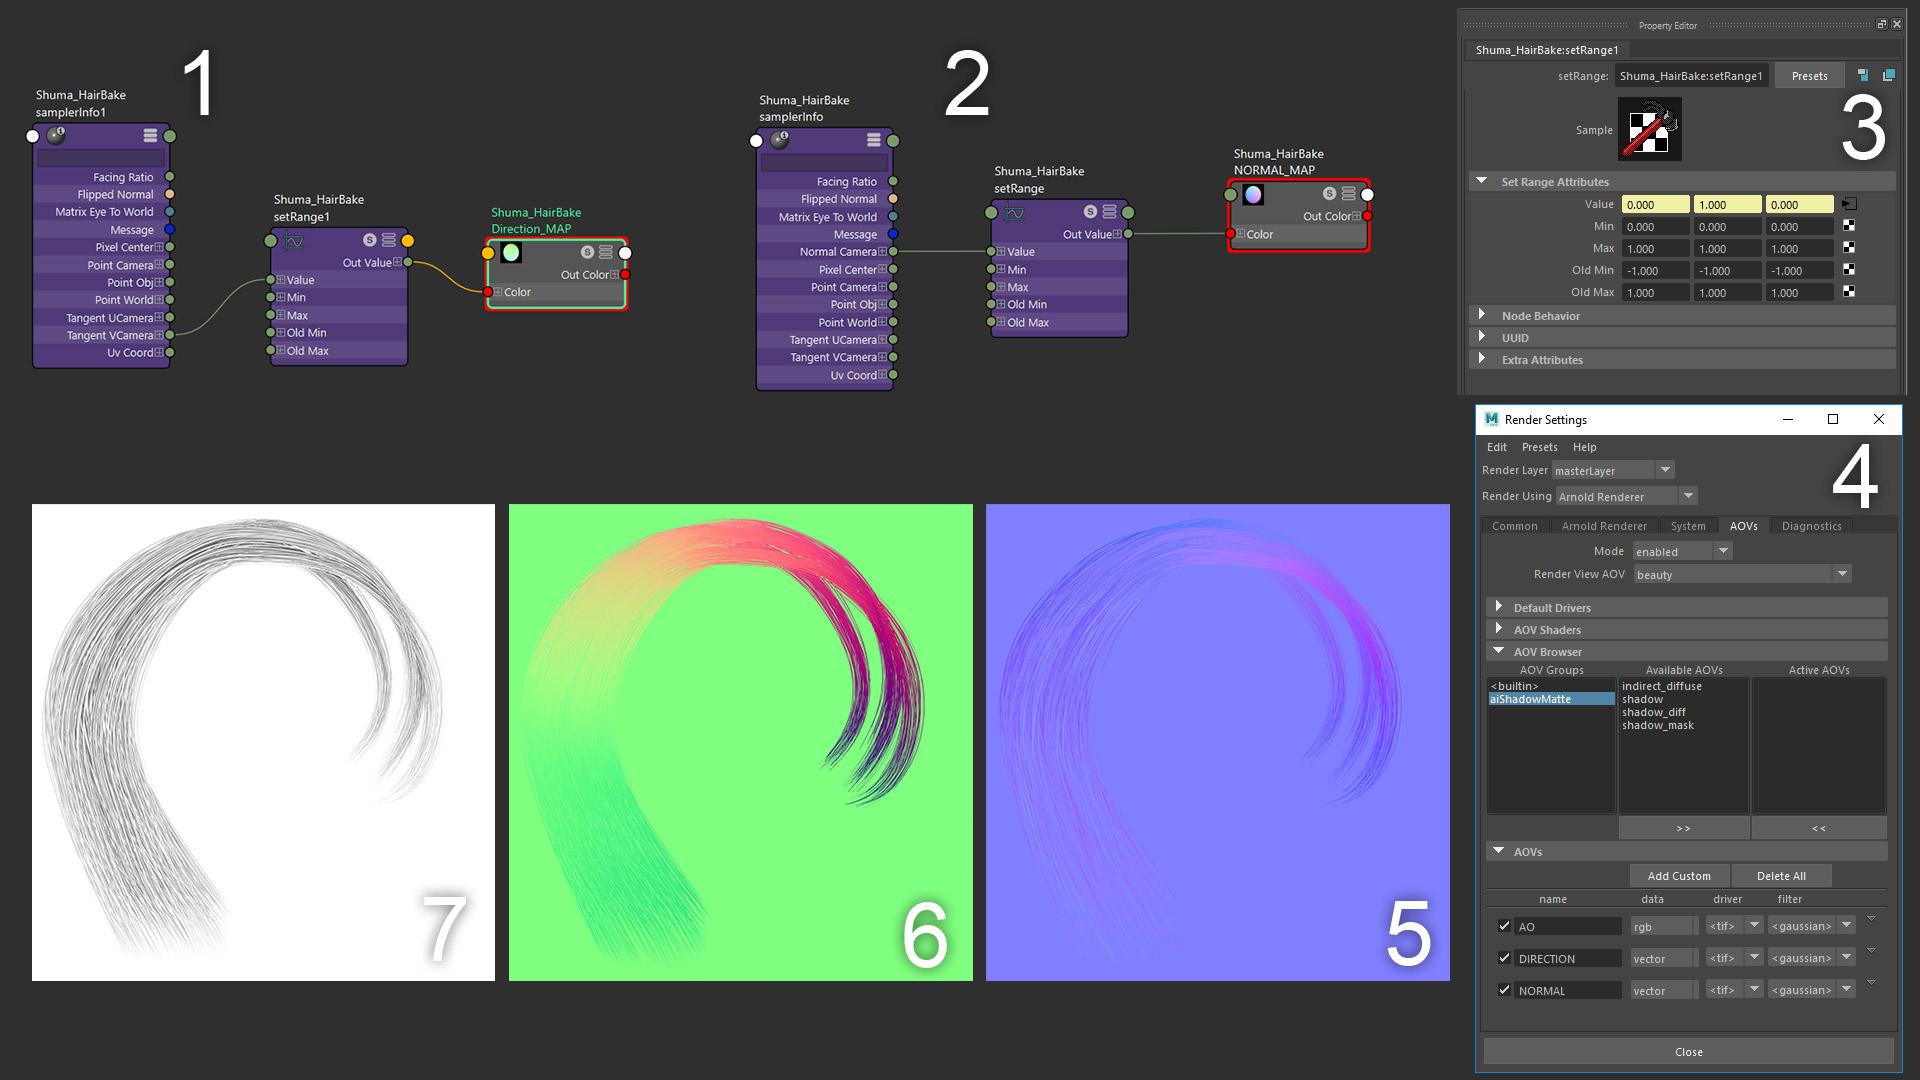
XGen allows you to create a variety of maps for hair card textures which are difficult to create using other techniques.
- Node graph for Normal map
- Node graph for Directional map
- Set Range Node for remapping value in the 0-1 range
- OAVs configuration
- Normal map
- Directional map
- Ambient occlusion map
I’ve set up a material to use as a render pass using Maya’s Hypershade. This way, I won’t have to convert the hair into geometry and render the normal map in another software. I used the built-in Sampler Info node because it helps render a lot of different information. In our case, we’re interested in the Normal Camera and Tangent VCamera. The node output values are set to a range of -1 to 1 by default, so I’ll need to remap the value range from 0 to 1 to store a correct value for the normal map.
I’ll need to put this shader in a new AOV to produce a render pass for my Normal map and Directional map. Be sure to set the Data Type as Vector to export in a linear colorspace instead of sRGB. I’ve added a plane behind the hairs with a neutral color applied that corresponds to my map. This helps avoid errors on the border of each hair when they’re anti-aliased with the default black background. Once they’re created, you can plug these maps in Toolbag’s Directional map slot (as shown in the Material Setup section above). The following gif shows what happens when a Directional map is applied to hair.
This Maya file contains my shaders for Ambient Occlusion, Normal, and Directional maps that you can use as AOVs to render your maps. Simply go to Hypershade -> File -> Import the files and add the shaders to your scene.
Note: This file is likely to only work with Maya 2017 and newer versions, since there was a change to the default renderer.
Crystal Creation

I wanted something to contrast the cold look of the scene, so I came up with this magical glowing crystal. Besides balancing the composition of the image, it gave me the chance to play with Toolbag’s Refraction and Emissive capabilities. The crystal was sculpted, decimated, and UV’ed in Zbrush. The textures were made in Substance Painter and Photoshop.
Below are the texture maps I created for the crystal:
- Gloss map
- Heat map
- Albedo map
- Specular map
- Normal map
The crystal is composed of two layers of geometry with two different materials. The first uses Refraction, found in the Transparency module. I checked Use Microsurface so I could use a Gloss map to blur the refraction. The emissive material inside the crystal gives a translucent impression. The second layer uses a heat map to produce the glowing effect. This emissive mode is very handy, since you only need to author a greyscale map which can easily be generated from Substance Painter. Toolbag will take care of displaying the physically correct color according to the Temperature value. To push the glow further, I added a strong color for the Reflectivity and pushed the Intensity value to 2. Adding a Secondary Reflection with adjustments to the Anisotropy and Refraction Shift sliders gives an unpredicted glowing effect.
Presentation
This section demonstrates how I used the lighting system and post processing features in Toolbag to present the final render.
Lighting
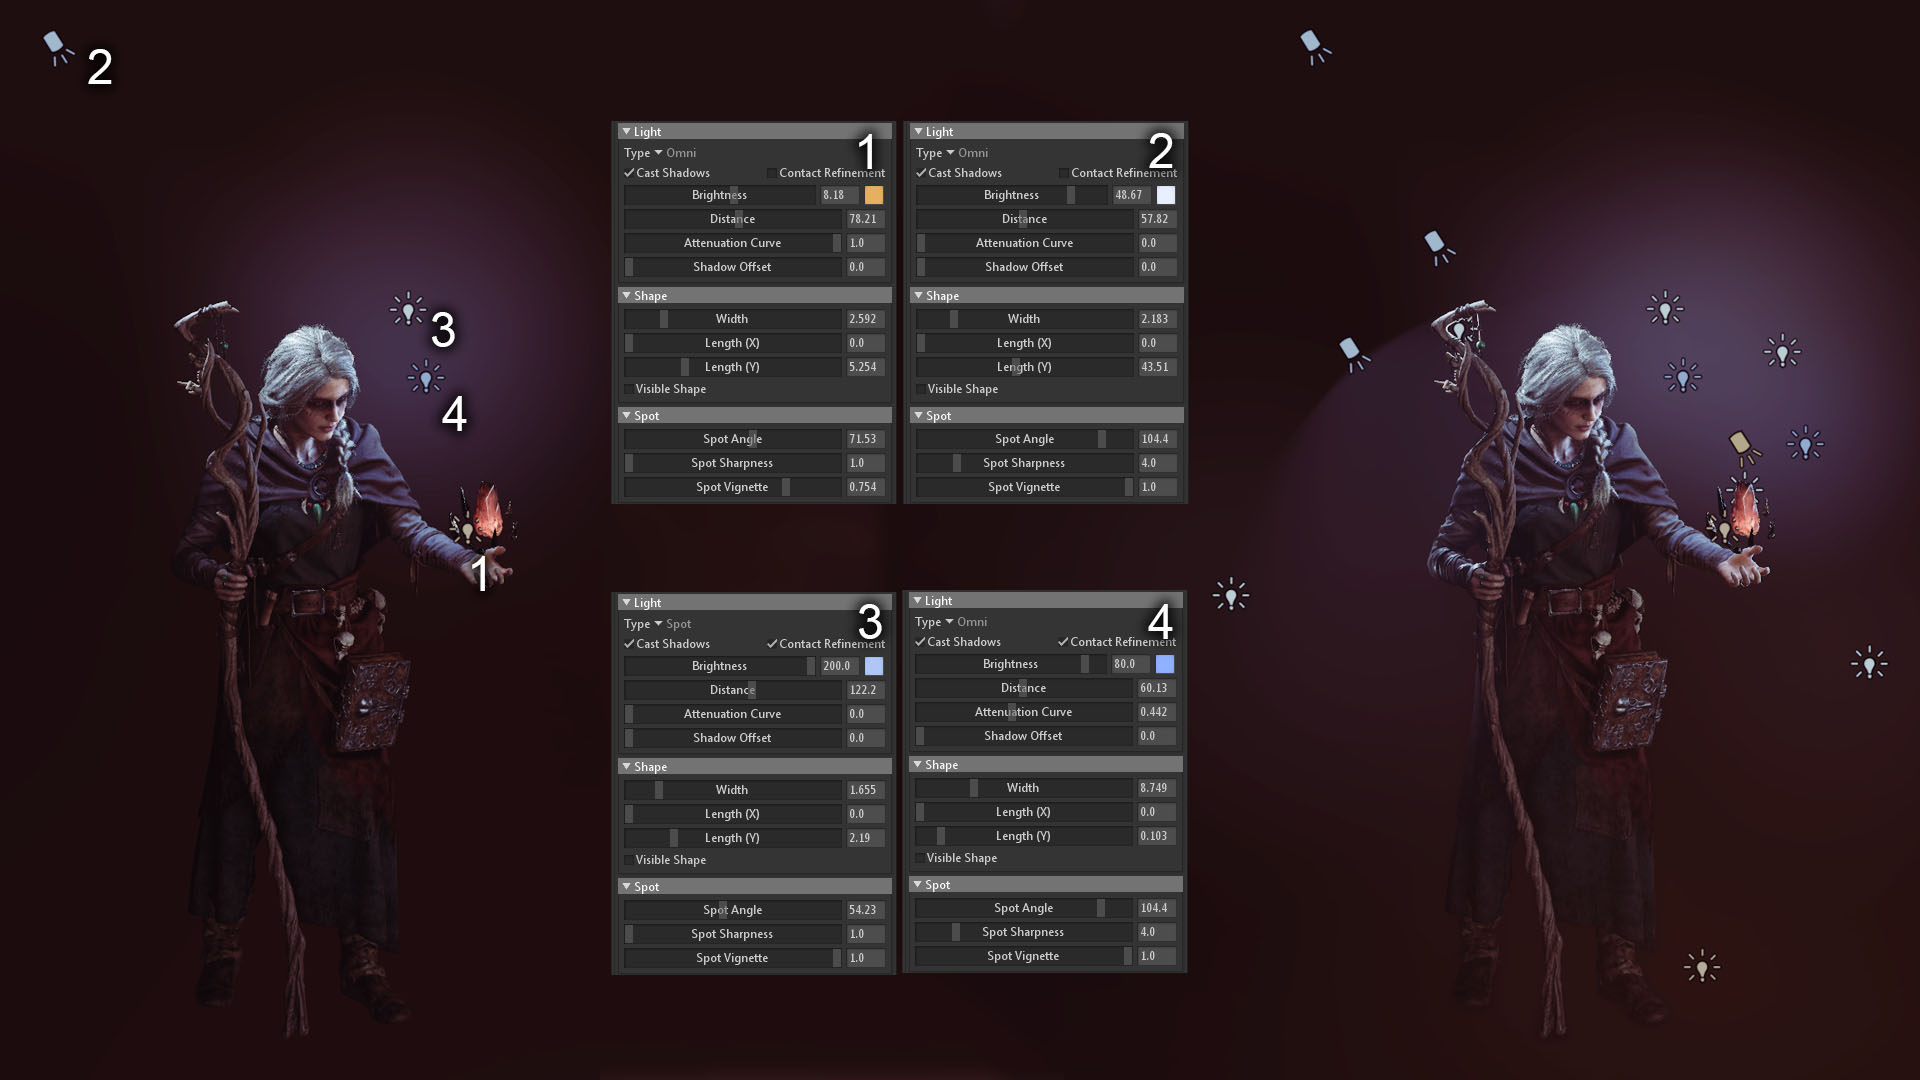
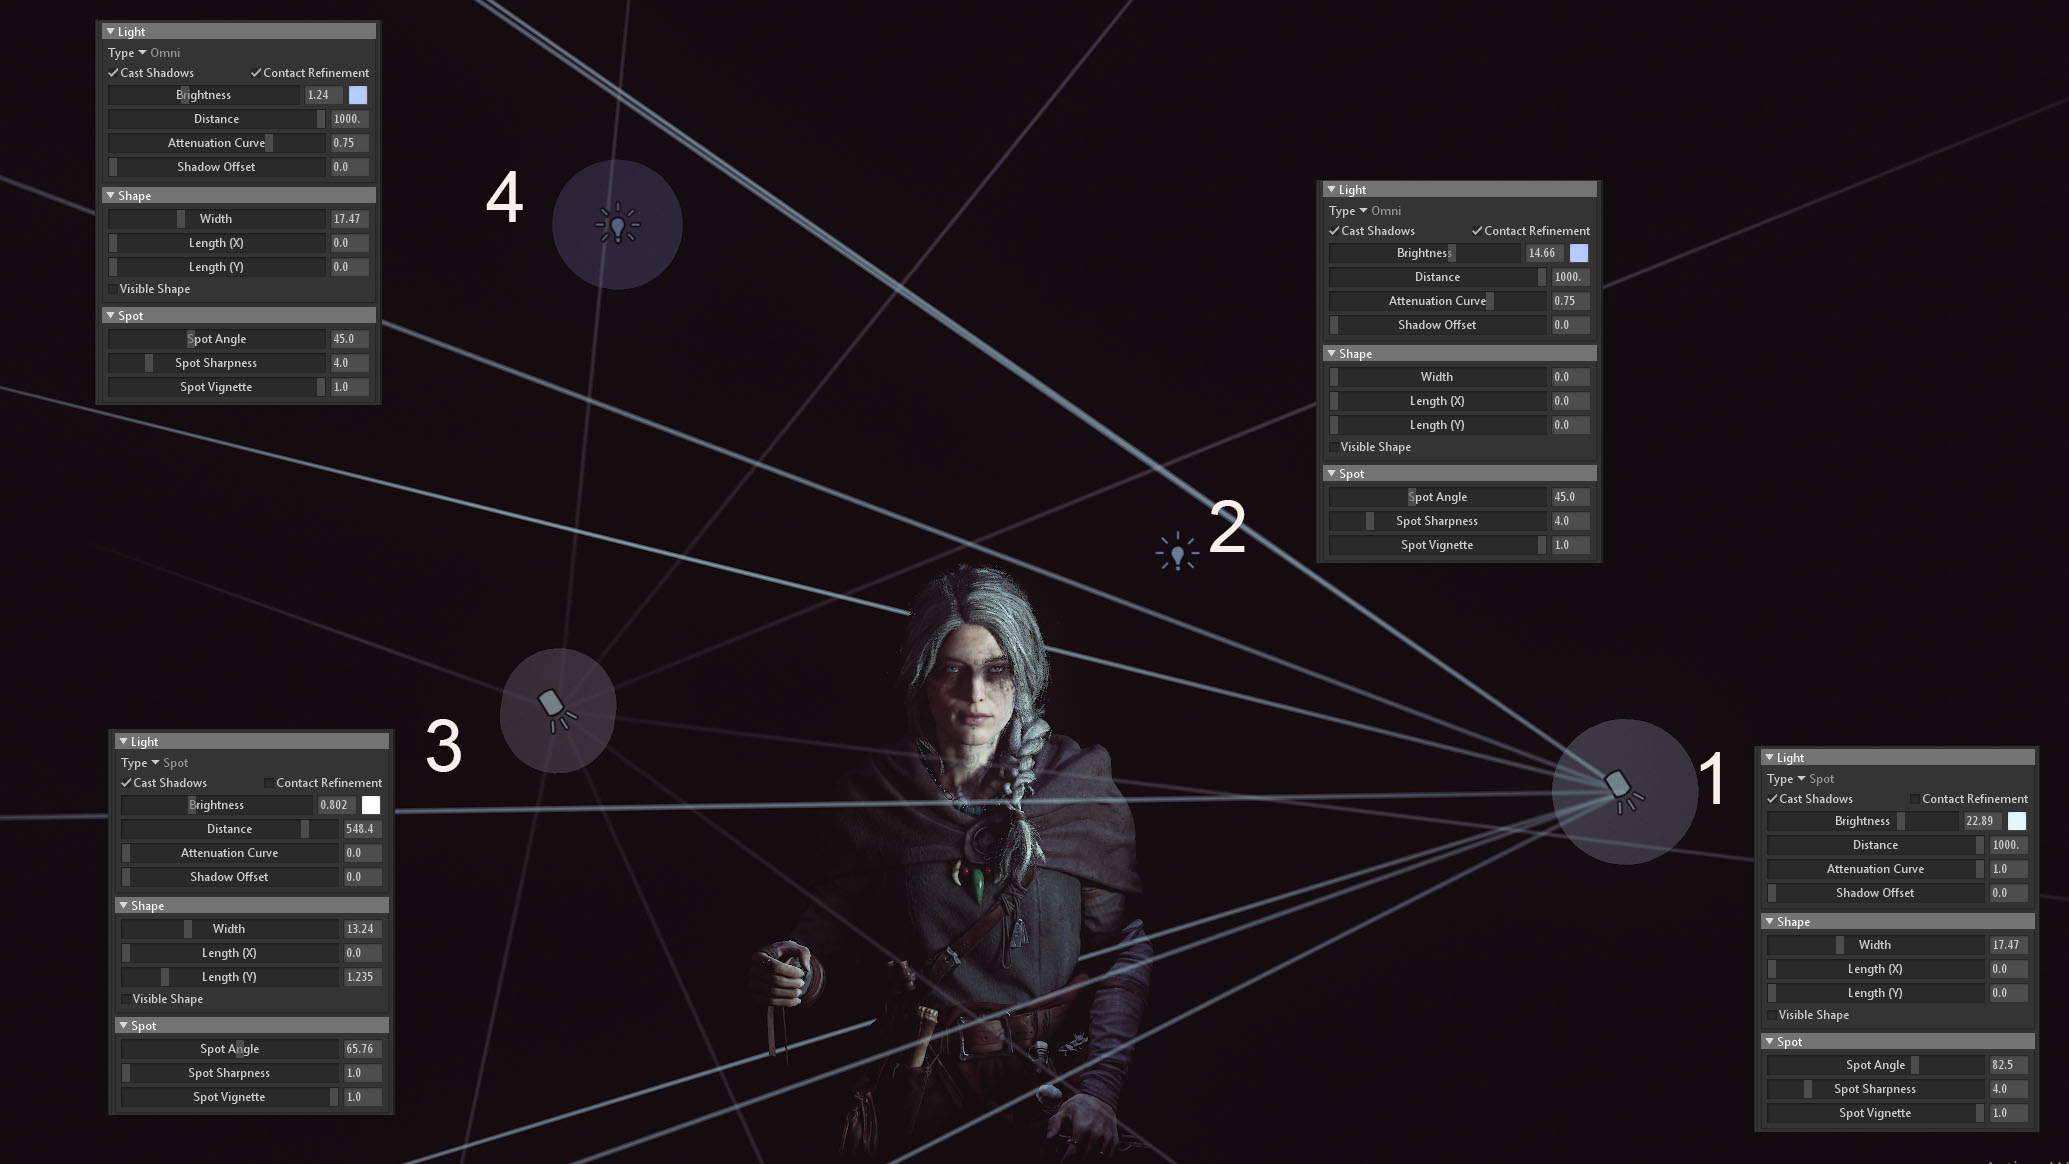
The starting point for my lighting was a simple 3 point light setup. Below is a full breakdown of my sky and lights. The left side of the image shows my 4 main lights, the right side shows the setup with all of the lights.
- HDRI: I used the Ennis House Sky Preset. It’s perfect for my scene due to the low ambient lighting. It gave me just enough light to fill the image and push the contrast in the bright area. It also created nice reflections on the eyes and metallic surfaces.
- Main Light (1): This is the warm light emitting from the crystal. Since the light is in front of her face, I used just enough of a low value to give a warm tint to the character while keeping shadows on her face.
- Back Light (2): A strong blue colored light to complement the orange color from the crystal.
- Rim Light (3): Since the background is almost entirely black, I needed more light to detach the character from the background and have more visible shapes. I used around 8 rim lights to create a highlight across the character. I use long, thin lights when I need to create a contour and put emphasis on the silhouette of a character. I also add a sharp (really small Width) point light to bring out specular highlights on reflective materials like leather or metal.
- Key Light (4): I added a strong blue light on the side of her face to help emphasize the focal point and sculpt the face. The blue color also counterbalances the warm light of the crystal and the light shapes on her skin.
- GI: Adding Global Illumination helped ground the character with correct occlusion and brought out realistic reflections.
- Fog: This helped with creating mood and toned down the overall contrast of the image.
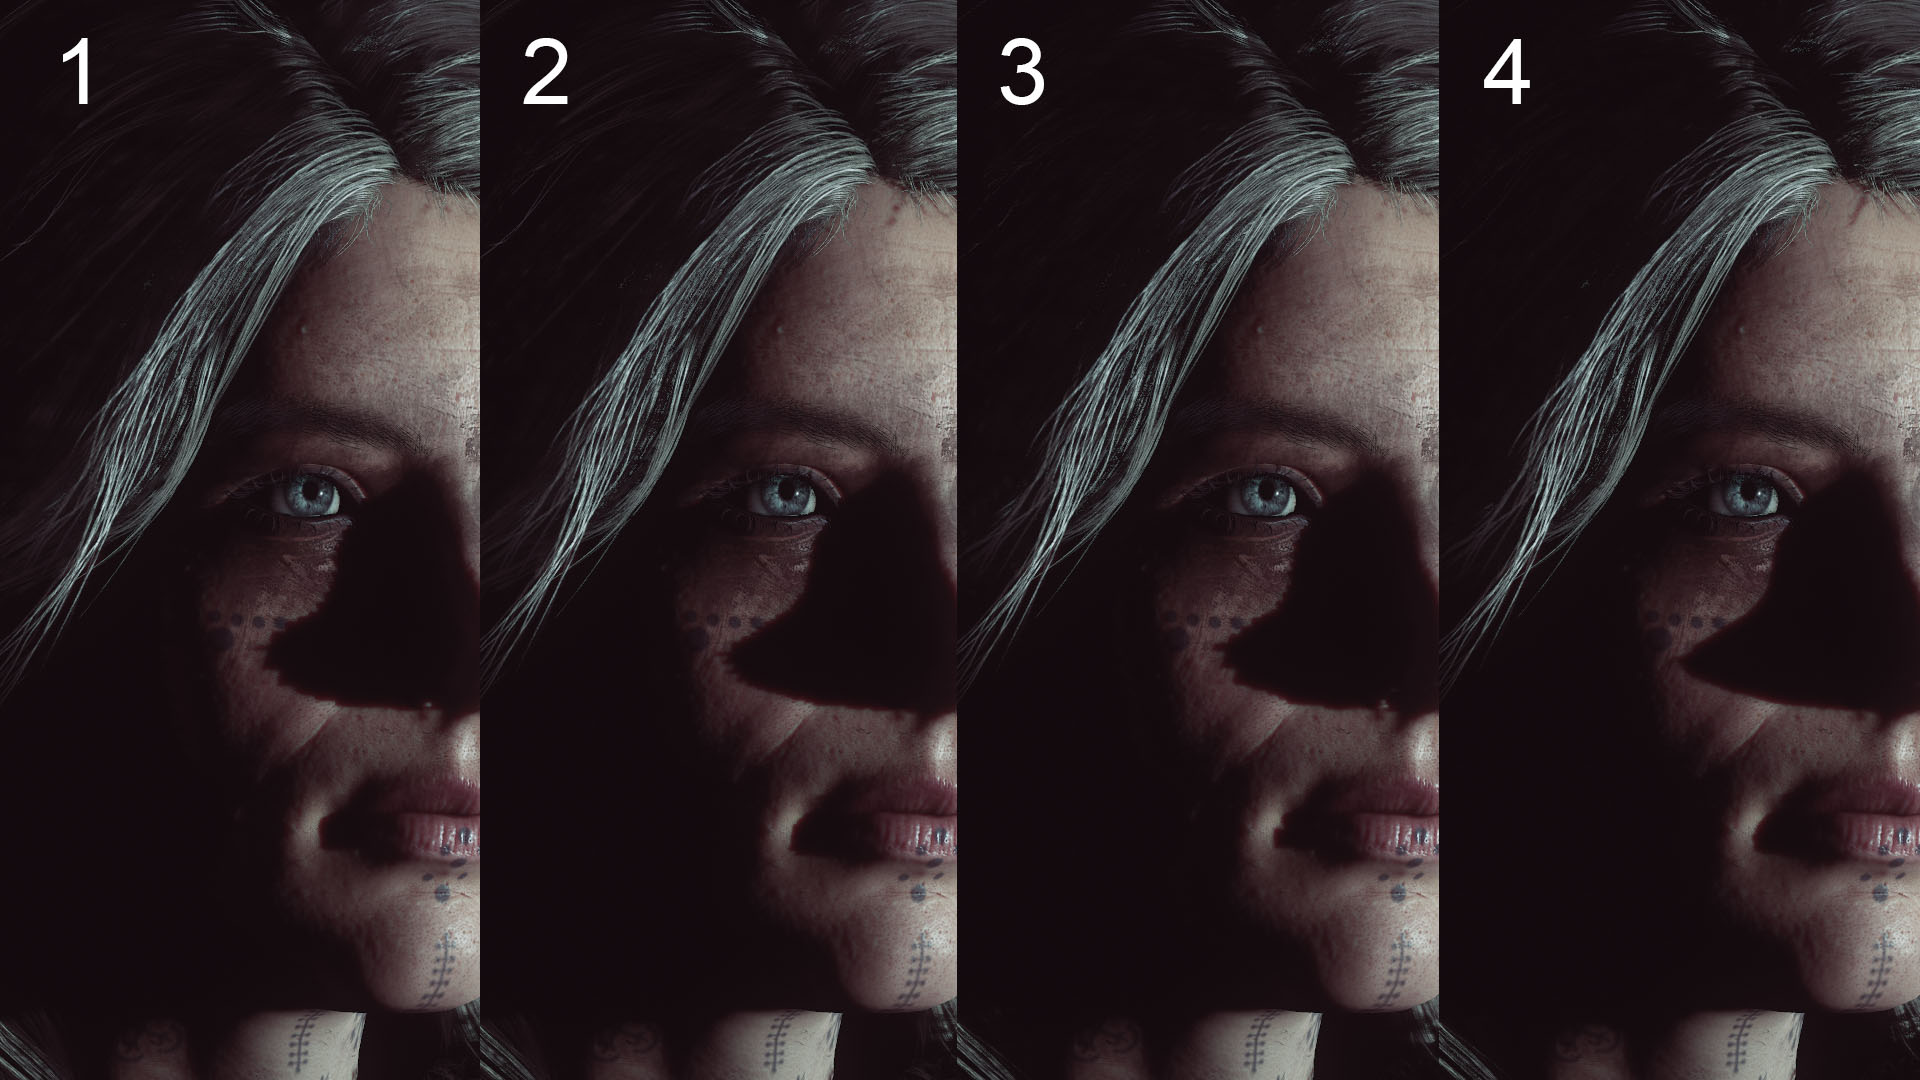
This image demonstrates the different shadow quality results of Omni and Spot Lights. The worst case scenario starts from the left and progresses to better quality on the right. Increasing the Width of the light will blur shadows and increase the quality.
- Omni Light with Shadow Resolution set to High.
- Omni Light with Shadow Resolution set to Ludicrous.
- Spot Light at an Angle of 120 with shadow resolution set to High.
- Spot Light at an Angle of 30 with shadow resolution set to High.
Post Processing
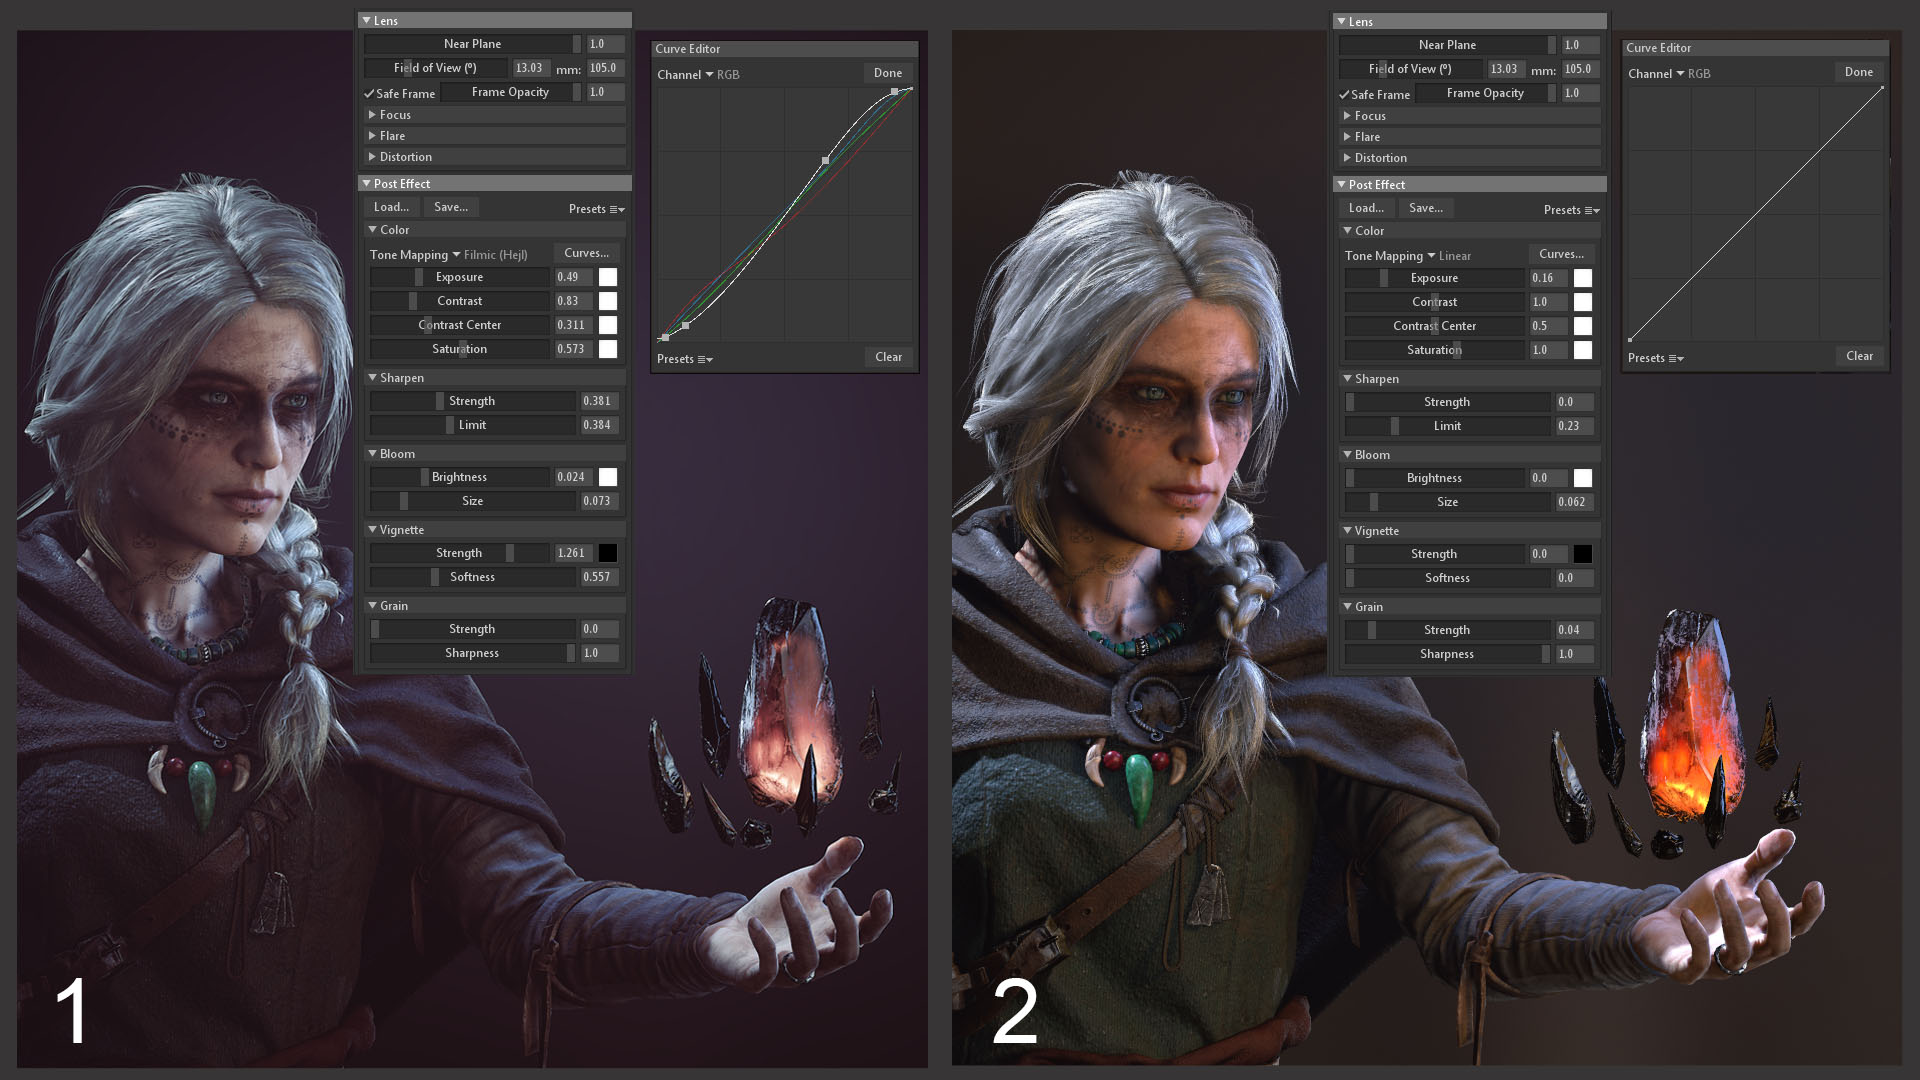
Since I wanted a moody picture, I relied heavily on Toolbag’s built-in post processing capabilities to finish my render. The image above shows my render before (1) and after (2) post-processing edits. I added some slight noise and curve edits in Photoshop.
Portrait Lighting

Real-time portrait lighting can be pretty tricky, mainly due to the low quality of shadows. However, Toolbag’s powerful lighting system makes it fun and easy to light portraits. No GI or Sky lights were used for this setup, it relied solely on Toolbag’s regular lights.
- Main Light: A bright blue light placed to the left of her face. I can move the light left or right, depending on the amount of shadows I want to have on the right side of her face. Since there is no Sky Light, there is no reflection from the environment. This will be the only Light to bring out specularity in her eyes. I increased the Width of the Light to create nice specular spots in her eyes, which help make her feel alive. It also helps smooth out any hard shadows.
- Rim Light: This brings out her silhouette against the dark background and creates some highlights on the hair and jewelry.
- Fill Light 1: I wanted her right side to blend with the dark background. So I kept the Intensity value very low to give a bit of ambient lighting and bring back some information from the shadows.
- Fill Light 2: This is the same as Fill Light 1, but for the hair.
Conclusion
Thank you for reading, I hope you find this breakdown useful. Thanks to the Marmoset team for giving me the opportunity to write this breakdown and for creating this great real-time renderer.
We would like to thank Emmanuel Lecouturier for writing this breakdown. You can find more of Emmanuel’s work on Artstation. Find out how Toolbag can bring your character art presentation to the next level with the 30-day free trial, and visit our Tutorials section for more breakdowns.